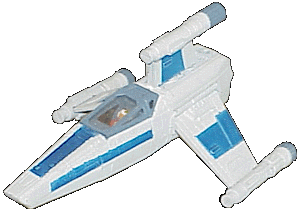
Building the T-Wing
- Get yourself an Action Fleet X-Wing. Try
eBay.
- Use a hobby saw and slice off the “snub nose” (the bulbous tip).
- Remove the screws in the base and disassemble the ship
- Build the two lower T-Wing engines
- Remove two X-Wing guns from the wing tips
- Cut off from the thickest part of the guns forward - including the thickest part - and discard
- Turn the guns around - the back of each gun is now the front of each T-Wing engine
- Cut off the rear ends of the two lower X-Wing engines – about 1.5cm, the short corrugated part plus a chunk of piping
- Glue these to the back of the T-Wing engines (what was the front of the X-Wing guns)
- Build the one upper T-Wing engine
- Remove one X-Wing gun from a wing tip
- Cut off from the thickest part of the gun forward – not including the thickest part - and discard
- Turn the gun around - the back of each gun is now the front of each T-Wing engine
- Cut off the rear end of one of the upper X-Wing engines – about 0.75cm, just the long corrugated part.
- Glue this to the back of the T-Wing engine (what was the front of the X-Wing gun)
- Build the wings:
- The wing surfaces are the upper two wings of the X-Wing – they have the same orientation on the T-Wing (flat edge forwards, angled edge
backwards)
- Cut just past the engine
- Slice off the pegs to which the guns were attached
- The T-Wing engines have handy slots which slip over the wingtips, but the wingtips are too long, so you need to cut a notch in the back
of the wingtip so the engine fits
- Build the fin:
- The fin is just the remaining two lower wingtips of the X-Wing sliced off and glued back-to-back.
- I can’t remember how the engine is mounted, so be creative
- Build the aft fuselage:
- Slice the fuselage (both upper and lower halves) in half at the forward edge of the R2 slot. Note that this should line up (so mark/cut
both at once) and that the screw on the bottom surface should be intact and just forward of the cut.
- Slice the aft fuselage (both upper and lower halves) from the wing cutout forward. This unfortunately turns the aft fuselage from a nice
stable boxy structure to a spindly upper and lower segment held on by one screw at the rear of the craft.
- OPTIONAL: Tweak the forward fuselage
- If you can, remove about 0.75cm of nose between the cockpit (on the top) and the landing gear slot (on the bottom) and add a slight downward
angle to the nose. This is tricky and it’s not critical to getting the overall shape.
- Assemble everything:
- Use a “plastic weld” material – this is a liquid you can get from a hobby shop that effectively “melts” plastic together. Much stronger
than glue. You hold two pieces of plastic flush and brush it along the edge; it wicks into the gap and the plastic will bond almost instantly.
- Screw the upper/lower forward fuselage back together. Leave the upper/lower aft fuselage separated
- Mount the wings by simply welding them to the inner upper surface of the aft fuselage. They should take on a pleasing downward angle. Make
sure they are symmetrical.
- Weld the fin simply onto the top of the aft fuselage
- Weld the upper aft fuselage to the upper forward fuselage. Note that this is the weakest part of the ship so don’t skimp. Maybe build up
some extra polystyrene here for strength.
- Simply screw the lower aft fuselage into place at the rear. This actually leaves a large space for cargo inside if you want to get fancy.
- Finish it
- Use hobby putty to fill in any gaps (e.g. at the nose)
- Paint!
